[ad_1]
Here’s a simple DIY project for anyone with blank wall space and a taste for clean, minimalist decor. This easy-to-follow tutorial shows how to create a striking grid of black-and-white framed photos. I’ve written the steps like a recipe to keep things friendly and straightforward—perfect for beginners or anyone who wants a quick, stylish update for a hallway, living room, or bedroom wall.
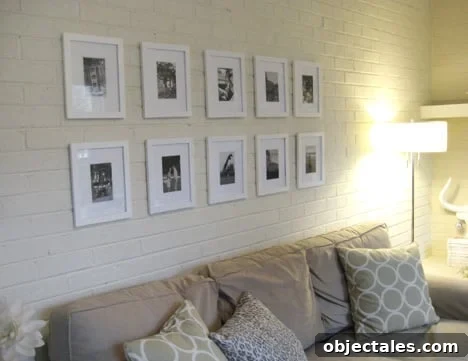
INGREDIENTS
- An even number of identical frames (I used ten white 8×10 frames from a big-box retailer)
- The same number of black-and-white photos sized to fit each frame (regular 4×6 prints are easy to source)
- White paper or lightweight mat board to create a clean border or “mat” for each photo
- Scotch tape or archival-friendly mounting tape to secure photos behind the mat
- A level, measuring tape, and a pencil for accurate hanging
DIRECTIONS
1. Choose your photos and convert them to black and white. Converting color images to grayscale creates a cohesive look across the grid and simplifies the visual impact of the arrangement. Slightly increasing contrast can help details stand out and give a crisp, gallery-style finish.
2. Prepare the photo prints. Export or save your selected images at the appropriate resolution for printing. Most photo labs and retail kiosks accept USB drives, memory cards, or direct uploads from your phone. Print your photos at a size that fits your frames; 4×6 prints work well when framed in 8×10 frames with a white mat for a balanced border.
3. Create the mat backing. Cut white paper or mat board to the interior dimensions of each frame. If you want a consistent border, measure and mark the same margin on each mat so every photo sits centrally with equal spacing around it. The mat not only improves presentation but also prevents the photo from touching the glass directly.
4. Mount the photos to the mat. Use a small loop or two of scotch tape behind the photo to secure it to the mat. If you prefer a more archival method, use acid-free photo corners or mounting tape to avoid damaging prints over time. Place the photo carefully so it is centered and straight before sealing the frame.
5. Assemble the frames. Insert the mounted photos and mats into the frames, close them up, and make sure the glass is clean and free of dust or fingerprints. Set the frames face down on a soft surface to avoid scratching.
6. Plan your grid layout. Lay the frames out on the floor first to experiment with spacing and arrangement. A simple grid—two or more rows with an equal number of frames in each row—creates a tidy, modern look. Keep consistent spacing between frames; a typical gap is 2–3 inches, but you can adjust to fit your wall and furniture scale.
7. Mark and hang. Measure and mark the top and side margins on the wall. Use a level and measuring tape to transfer the layout from the floor to the wall, marking each hanging point lightly with a pencil. Install appropriate hardware for your wall type—picture hooks, nails, or wall anchors—and hang each frame, checking alignment with a level as you go.
8. Final adjustments and styling. Step back and inspect the whole arrangement. Make tiny adjustments so all frames align evenly and the overall grid feels balanced. Once satisfied, enjoy your refreshed wall art. This simple gallery approach adds a cohesive focal point to any room and can be updated seasonally or swapped with new photos whenever you like.
This project is quick, affordable, and highly customizable. Use different frame colors, change mat widths, or vary photo subjects to reflect your personal style. Whether you’re decorating a rental, staging a room, or just adding personality to an ordinary wall, a grid of black-and-white frames delivers a polished, intentional look with minimal effort.
[ad_2]






